Something a little fun and maybe scary..

Oh my gosh…it’s been a while!

So much has happened, babies, jobs, houses lalalalal but enough of that and onto the good stuff.

MaKeUp, that is why we are here after all.

I am in love with skulls and anything Dawn of The Dead inspired which made me super happy to be asked to do this awesome makeup the other day.

The brief was scary, red and Dawn of the Dead…Yesss. Here is the end result.

Dawn of the Dead makeup 1

Dawn of the Dead makeup

20150216_153324

For Makeup inquiries please contact themakeupcase@hotmail.com


What’s my skin tone?

I was just having a quick browse of the internet and came across this post by Lady Fabuloux. It is a really simple way to determine your skin tone so thought you may like to read it too.

Determining your skin tone can help you choose the right colours to suit you, with not only makeup but with clothes and jewellery too. If you have ever used a lipstick or foundation that just doesn’t look right, it could be because it doesn’t match your skin tone. So read all about it.

Lady fabuloux: What’s my skin tone ?.

Here are the basics;

First of all , you have two groups of skin tones – Cool skin tones and Warm skin tones.
Cool skin tones – the skin has a little pink in their skin (these people will burn easily)
  • People who look good in silver and not too great in gold , but also people who look better in ash colors.
  • Most of the time your veins will be blue ( take a look at your wrist)
  • Cools look better in white as opposed to ivory. And they look awesome in black.
  • You also have a cool skin tone if you look good in these colors :
Warm skin tones – the skin has a yellow undertone or golden undertone. ( these people will tan easily)
  • If you have a warm skintone gold will look better on you than silver jewellery.
  • You look more beautifull in golden haircolors then in ash hair colours.
  • Most of the time your veins will be green (take a look at your wrist)
  • Warms look better in ivory over white and washed out in black.
  • You also have a warm skin tone if you look good in these colors :
 
Thanks Lady Fabuloux for a great post. We will be back for another read soon.

How to stay Stylish, Fabulous and Warm this Winter.

Don’t you just love it when you stumble upon something new? That very thing happened to me just last week.

I have just discovered Marikit, the beautiful hand made knits designed by the equally stylish designer Kitty. And I have to tell you a secret…I think I am in love! I have fallen in-love with Marikits designs, not only are they such a stylish pieces of clothing they are also all hand made by Kitty.

Starting of selling her fabulous design at Sydney’s Surry Hills markets, Kitty now stocks her knits at Museum in Paddington and Bondi Junction, not to bad for a lady who said she had no idea about knitting and designing when she first started out.

“Believe me, my first knitting piece was the weirdest shape – I remember it was bright yellow and it was meant to be a rectangle, but it ended up being the shape of an omelette with holes through it as big as your thumb!!! I’m a stubborn chickie, and with mum giving me more encouragement – I continued…” and lucky for us,  she did!

Another thing I just love about Marikit is that Kitty does all her knitting from the heart, you know that every piece she knits is made with love and you can really see that come through in her designs. No surprise then that the first piece she knitted was for her first boyfriend (so cute);

“I remember my first garment – don’t laugh – it was for my first boyfriend when I was 16!!! I was so proud of myself – I slaved over it for so long, and when I gave it to him – he was just so impressed! That’s why i love knitting so much – knitting is such a loving gesture because you think about the person while you knit every stitch – and the person will always remember you when they see the knit you created”.

“Also when people meet me and see my style – from the outside, knitting is so not me….and that’s the other thing – it’s such a shock tactic when people realise I can make something from scratch….knitting is such a dying art nowadays. It also gives me freedom, like theres no wrong or right way – honestly, I don’t follow any patterns when I knit (I can hardly read one) – I just see something and then I just whip it up!!”

If you love Marikit as much as The Makeup Case does and and you want to be warm and stylish this winter you should check out Marikit Facebook page.

Marikit also custom makes their knits so if you are looking for something special and unique Kitty will design something amazing! And with all knits under $100, you will be a silly little Vegemite not to.

You can place an order for your own Marikit knit through the Facebook page or by emailing TheMakeupCase and we can pass your deets along.

PS: Do you want to hear something super cute? The name ‘Marikit’ came about because Kitty wanted to share Marikit with my husband (who’s Philipino) –  and the name is actually Filipino for ‘lovely/beautiful’ (awwwwwww).

How To….Clean your makeup brushes

We get asked this everytime we have a job. It is a very important part of maintaining your brushes and most of all, it will keep your makeup looking how you want it too. Clean your makeup brushes people!

At makeup school we were taught to clean our brushes after every person, do you know how many nasty things you can pass on from person to person? When your doing face after face the best way to clean them is to use a brush cleaner that has alcohol in it. This will remove almost all the product but more importantly it will kill any bugs that you may have come across.

So your brushes (depending how many times you use them) should be cleaned at least once a week. We clean our brushes properly after each job to keep them in tip top condition and so we don’t pass on any yuckies to anyone else. How do you do it? I hear you ask.

I found this new way to clean brushes. We have always used shampoo and brush cleaner, but this method, I find, also works a treat. I found it on You Tube and its by Makeup Geek. This  is an awesome site for all your how-to’s, tips and trick and products.

So make sure you keep your brushes healthy and hygienic, your makeup and your face will love you for it!

*video courtesy You Tube and Makeup Geek TV

Fishtails and Lauren, so fashionable darling..

A few posts ago I confessed to you all my love of braids. Not much has changed since I wrote that post, I still love braids more than ever. I know, it’s a sickness but, at least it’s a good kind of sickness, right?

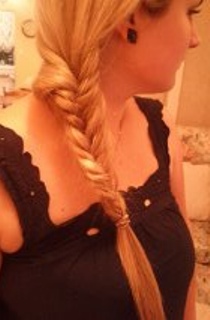
So last night when I was racing about all over You Tube searching beauty videos (there are some really good ones out there, mixed amongst the outrageous number of bad ones), I found a great instructional video on how to do a great Fishtail Braid. And it was made by the very fashionable Lauren Conrad!

I have never been great with Fishtail Braids, shying away from them at Makeup School was a great pass time of mine. I always thought they looked to complicated and something I could never get right. So plucking up the courage I thought I would give it ago, the video made it all look so simple,  with easy step by step instructions. And guess what?  I loved the result, it wasnt that hard at all, I don’t know what I was so worried about all this time.

20111110-202233.jpg

And just incase you want to watch the great video in question, here you go…


Isn’t it great? It is so easy to follow and makes the Fishtail Braid seem so uncomplicated.

Do you guys watch beauty videos on You Tube? We would love to know what ones you think are the best.

*video coutesy of youtube.com


Braided Innocence.

Braids! Every girl loves them (at least that is my opinion and the only one that counts, right!) and I am no exception to that theory. I absolutley love braids, they are cute, girly and innocent, taking me back to a time where I cared more about ice cream then I did about dieting. When days were filled with adventure and maybe getting the odd punch or two from my little sister (yep, that was a regular ocurance for me).

When its a beautiful hot summer day outside and I dont want to risk that dreaded frizz then braids are my first choice. A lot of girls seem to think braids are hard, maybe they are but once you get the hang of it and practice a few times you can have a beautiful braided up do in minutes. That is what I am going to show you in this post, glamour within minutes.

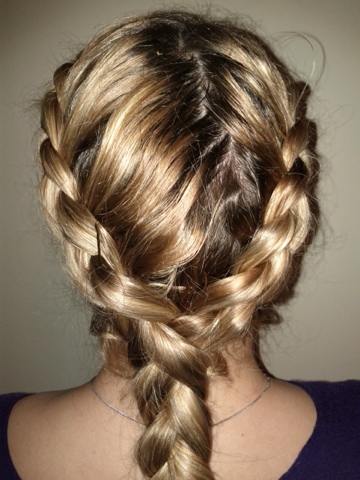
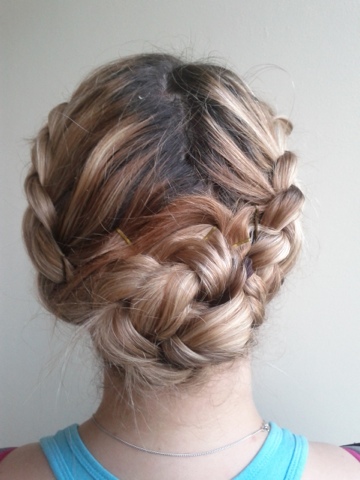
First start off by parting your hair in the middle. Braid from the front of your hairline down into a plait. Repeat on the other side. Once you have braided each side combine the two sides and plait into one. Secure with a thin elastic.

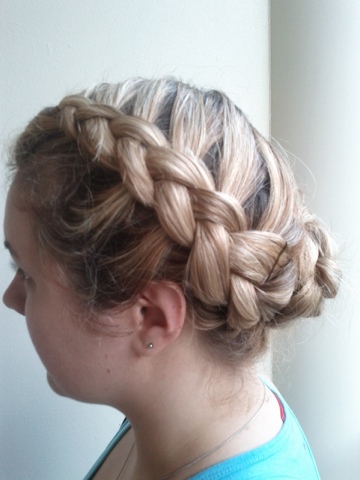
Wrap the plait up into a low bun.

20111101-222211.jpg

20111101-220144.jpg

20111101-220412.jpg

And there you have it a beautiful easy summer up do.

Simple Pop Colour Eyes

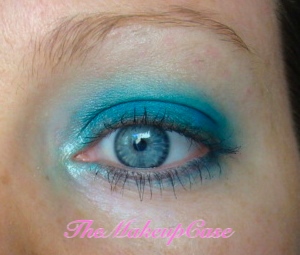
Now at The Makeup Case we love colours and being the hot trend right now, pop colour, I thought I would try a little colour on my eyes. A lot of the time I wear a coloured top so I try to keep my eye makeup simple and natural, but when you wear black you have no excuse and should go wild! I dug through my kit and found my colours, I chose a MAC satin eyeshadow; Electric Eel. Whenever I think of blue eyeshadow, I immediatly think 80’s but this is different. I promise.

  • Start with your normal eye base or primer, try to use something close to your skin colour so you don’t change the eyeshadow too much, maybe try concealer.
  • Using a medium firm-ish brush, pat the eyeshadow all over your eyelid, then blend it with a softer brush.
  • I used a really small amount of a dark grey just in the outer corner to give my eyes a bit of depth.
  • I finished with a bit of white shimmer on the inner corner, close your eye when you apply the shimmer then it will go where you want it and you don’t get it in your eyes.
  • Finish off with a black eyeliner on top and bottom and your favourite mascara. I also blended the Electric Eel half way along the bottom eye line, just for a little bit more colour.

You could do this look with any colour you want, purple, green, yellow, gold, pink, orange, its up to you! Why not try it next time you step out in your little black dress. Best of all it is so quick and easy!

Hot Tip…Big lips without the Collagen!

Do you have a small top lip like yours truly? Well I think I have the solution to all our woes, and it doesn’t involve a trip to the local botox administrator for a jab or two. It is a much cheaper and less painful option then surgery, and looks a million times better.  In fact you can achieve the big upper lip we all crave from three makeup products you probably already have in your makeup kit; a lip pencil, red lip gloss and a gold eye shadow or shimmer. Can you see where I am going with this? If not or even if you are a smarty pants you should keep reading and see how this at home miracle is preformed.

At first we need a before shot so you can all witness the small lip in question.

First step is to outline your lips with a lip pencil, to make them bigger you can outline just above your natural lip. I always fill in my lips with the lip liner as well, it helps your lips stick or gloss stay longer and you always have a bit of colour in case you do not get a chance to re apply.

Next step is to apply your favorite red lip gloss over the top. You might remember in a previous post I spoke about my fav Napoleon Perdis St John lip gloss, I am flaunting it below just in case you may have forgotten (Oh for shame).

Now for the all important step, the one that is going to make us look like Angelina (apologizes, I am not entirely sure if that is a good comparison, think of your most desired lip and that is what we shall base it on.) Pat your index finger into your gold eye shadow or shimmer pot so you get a good amount on your finger. Now dab it over your lip gloss in the middle of your upper lip, make sure you do not go all the way along your lip as it will not achieve the look we are after. The gold should blend into the lip gloss and reflex off the light, making your lip look fuller and extremely kissable.

This is a little trick we have picked up along the way and have since discovered it is used quiet a lot on the runway!

RRP: Napoleon Perdis St John Lip gloss $22. Available from Napoleon Perdis concept stores.

How to…Apply the perfect blush

Okay, I have something I need to admit, I love blush and the pinker it is the better. I am talking head over heels in love with blush, I would go as far to say I would marry my blush if I could. I have a heap of blushes in my make up bag and one that is on high rotation right now is a Gorgeous Cosmetics blush in Coral. I would not say that it actually looks like a coral colour but a candy pink, just perfect for my addiction.

I love highlighting the apples of my cheeks with a beautiful blush and the way I go about applying this is with a good blush brush. Firstly apply your foundation and powder to set, I usually then highlight my cheek bones with an illuminator and wait a couple of seconds so it sets. With your favorite blush in hand swoop your brush through the colour so it has a substantial amount to work with, tap the brush to remove any excess.

Now make sure you smile while you do this part, in a circular motion blend the blush on the apples of your cheeks moving slightly upwards towards your temple. Make sure you don’t go to over board though because you will end up looking like this ↓↓↓ and that is way to much, even for a barbie.

RRP: $39.00. Available from Gorgeous Concept stores and online.

* Image courtesy of gorgeouscosmetics.com

How to…Apply False Eye Lashes.

The Makeup Case is starting a new section which we are calling “How to…” A section outlining steps to achieve different makeup styles, hairstyles you name it and we will try to write about it. The first cab off the rank in “How to” is applying false eyelashes. So here we go;

Before false lashes have been applied.

The first step is to apply all your eye makeup; eye shadow, eyeliner and yes you still should apply some mascara. To apply false lashes you will need a few tools; tweezers, eyelash glue, lashes and scissors. The first thing that you need to do is measure the false lashes against your eye. Falsies come in many different sizes so you may need to trim a bit of the length so they fit.

After you have done your measuring squirt out a little bit of glue onto a tissue and holding the falsies with tweezers sweep the top bit of the lash through it. You will notice the lashes have smaller hairs at one end and longer hairs at the other, apply the side with the smaller lashes to the inside of the eyes.

You should then blow a little air onto the glue just so it doesn’t run and the glue goes a little stickier. Close your eye and apply the lashes with tweezers. Keep your eyes closed for a couple of minutes until the glue dries. Once you feel that it has, slowly open your eye, check out your handy work and start all over again on the other side.

After false lashes have been applied.

After.

There are many brands of false lashes out there and if you are only going to use them a single time I suggest you go with Manicare. You can get false lashes that will last you up to 10 uses if you look after them well enough from M.A.C, Gorgeous and The Makeup Store.

If there is any other technique you would love us to show in “How to..” we would love to hear from you.

RRP: $8.00 – $30.00 Depending on the quality and if the lashes are real hairs or fake hairs.